Hoffman2 Cluster Guide
From Wikipedia, the free encyclopedia
This article is about the writing implement. For other uses, see Pencil (disambiguation).
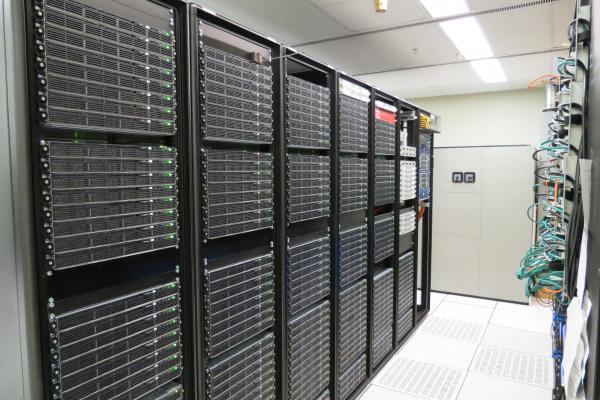
The Hoffman2 Cluster is a high-performance computing (HPC) resource provided by the Institute for Digital Research and Education (IDRE) at the University of California, Los Angeles (UCLA). It is named after Edward T. Hoffman, a former UCLA professor and pioneer in the field of high-performance computing.
The Hoffman2 Cluster provides a shared computing environment for researchers and students across multiple departments and disciplines at UCLA, as well as for external collaborators. It is designed to enable computationally intensive research projects that require large amounts of processing power and storage capacity, as well as specialized software and tools.
The cluster is composed of thousands of interconnected computing nodes, with a variety of hardware configurations and capabilities. It uses a job scheduling system called SLURM (Simple Linux Utility for Resource Management) to manage and allocate computing resources to users. The cluster also offers multiple storage options, including home directories, project directories, and scratch space, to help users organize and store their data.
The Hoffman2 Cluster is an essential resource for many research projects at UCLA, particularly in fields such as bioinformatics, genomics, computational chemistry, and physics. It has been used in a wide range of research applications, including molecular modeling, data analysis, machine learning, and simulation studies.
To use the Hoffman2 Cluster, users need to obtain an account through the IDRE website and have some basic knowledge of Linux, command-line interface, and job scheduling. The cluster provides multiple ways to connect and use the resources, including SSH, NoMachine, X2Go, and Jupyter Notebook/Lab.
Overall, the Hoffman2 Cluster is a valuable resource that enables researchers and students to perform complex computations and data analysis, and to accelerate their research projects. The cluster is continuously evolving, with new hardware and software upgrades, as well as training and support programs, to better serve the needs of the UCLA research community.
- 1Introduction
- 2Obtaining a User Account
- 3Connecting to the Cluster
- 3.1NoMachine
- 3.2X2Go
- 3.3Jupyter Lab/Notebook
- 4Submitting Jobs
- 5Transferring and Managing Data
- 5.1Transferring
- 5.2Managing
- 6Managing the Environment
- 7Monitoring the Cluster Status
- 7.1Checking the Status of Nodes
- 7.2Viewing Job Information
- 7.3Monitoring Resource Usage
- 7.4Viewing System Logs
- 8Troubleshooting
Obtaining a User Account
How to obtain a user account on the Hoffman2 Cluster
First, visit the IDRE website here to request a user account. On the website, click on the "Request a Hoffman2 account" button to begin.
You will be directed to a form that asks for your personal information, including your full name, email address, department or affiliation, and a brief description of your research project or purpose for using the cluster.
Fill out the form and submit it. Your request will be reviewed by the IDRE support team, who will verify your eligibility and confirm your account.
Once your account has been approved, you will receive an email with your username and initial password. You will also receive instructions on how to access the cluster and connect to the resources.
When you first log in, you will be prompted to change your password. You should choose a strong and secure password that you can remember.
Before you start using the cluster, it's recommended that you read the documentation and training materials provided on the IDRE website. This will help you get familiar with the cluster's architecture, software, and tools, and avoid common mistakes or issues.
It's also recommended that you attend a training session or workshop on the Hoffman2 Cluster, which are regularly offered by the IDRE support team. These sessions cover topics such as basic Linux commands, job submission, file transfer, and data management, and provide hands-on experience on the cluster.
If you encounter any problems or issues while using the cluster, you can consult the IDRE website for troubleshooting tips and contact the support team for assistance. The support team is available to help you with any questions or concerns you may have, and can provide guidance on how to optimize your workflow and performance on the cluster.
Connecting to the Cluster
First Steps
First, you will need to have an account with access to the cluster. If you do not have an account, you will need to request access from the appropriate parties.
Once you have an account, you can connect to the cluster using a Secure Shell (SSH) client. On Windows, you can use a program like PuTTY, and on Mac or Linux, you can use the built-in terminal.
To connect, open your SSH client and enter the following command:
To connect, open your SSH client and enter the following command:
ssh username@hoffman2.idre.ucla.eduReplace "username" with your actual username for the cluster. You will then be prompted for your password. Enter your password and press enter.
If you are connecting for the first time, you may be prompted to accept the cluster's SSH key. Type "yes" and press enter.
Once you are successfully logged in, you will be on the login node of the cluster and ready to submit jobs or run commands.
It's important to note that on the Hoffman2 Cluster, it is recommended to use the SLURM workload
manager to submit and manage your jobs. To submit a job, you will create a script file containing
the commands you want to run, along with options for the SLURM scheduler, such as requested
resources and estimated runtime. Then you can submit the script using the sbatch
command.
If you encounter any issues while connecting to the cluster or submitting jobs, please consult the official documentation of the Hoffman2 Cluster or contact the cluster administrator for more information and support.
NoMachine
First, you will need to download the NoMachine client from the official website: https://www.nomachine.com/download.
Install the NoMachine client on your local machine by following the prompts in the installation wizard.
Once the installation is complete, launch the NoMachine client.
Click on the "New" button to create a new connection.
In the "Host" field, enter hoffman2.idre.ucla.edu and in the "Port" field enter
22.
In the "User" field, enter your Hoffman2 username.
In the "Session" field, select X11 as the connection type.
Click the "Advanced" button to open the advanced settings.
In the "Session" tab, make sure the "Desktop" is set to GNOME.
In the "Security" tab, select the "Use SSH" option.
Click the "OK" button to save the advanced settings.
Click the "Connect" button to initiate the connection.
A window will appear prompting you to enter your password. Enter your Hoffman2 password and click "OK" to log in.
Once logged in, you will be presented with the NoMachine remote desktop interface. From here, you can launch terminal sessions, transfer files, and run graphical applications as if you were physically logged in to the Hoffman2 Cluster.
It's important to note that you will need to have an active user account on the Hoffman2 Cluster and a working internet connection to use the NoMachine client. You may also need to configure your firewall settings to allow the NoMachine client to connect to the Hoffman2 Cluster.
If you encounter any issues while connecting, you can refer to the official website link provided for more information and troubleshooting steps, or contact the cluster administrator for support.
X2Go
First, you will need to download the X2Go client from the official website: https://wiki.x2go.org/doku.php/download:start.
Install the X2Go client on your local machine by following the prompts in the installation wizard.
Once the installation is complete, launch the X2Go client.
Click on the "New Session" button to create a new connection.
In the "Session name" field, enter a name for the connection (e.g., "Hoffman2").
In the "Host" field, enter hoffman2.idre.ucla.edu.
In the "Login" field, enter your Hoffman2 username.
In the "Session Type" field, select XFCE or GNOME.
In the "Connection" tab, make sure the "SSH" option is selected.
Click the "OK" button to save the connection settings.
Click the "Session" button to initiate the connection.
A window will appear prompting you to enter your password. Enter your Hoffman2 password and click "OK" to log in.
Once logged in, you will be presented with the X2Go remote desktop interface. From here, you can launch terminal sessions, transfer files, and run graphical applications as if you were physically logged in to the Hoffman2 Cluster.
It's important to note that you will need to have an active user account on the Hoffman2 Cluster and a working internet connection to use the X2Go client. You may also need to configure your firewall settings to allow the X2Go client to connect to the Hoffman2 Cluster.
If you encounter any issues while connecting, you can refer to the official website link provided for more information and troubleshooting steps, or contact the cluster administrator for support.
Jupyter Lab/Notebook
Open a terminal window on your local machine and use the ssh command to connect to the
Hoffman2 Cluster using the following command:
ssh username@hoffman2.idre.ucla.eduReplace username with your actual username for the cluster.
Once connected to the Hoffman2 Cluster, load the Anaconda module by running the following command:
module load anacondaCreate a virtual environment for Jupyter by running the following command:
conda create -n myenv python=3.8Activate the virtual environment by running the following command:
conda activate myenvInstall Jupyter by running the following command:
conda install -c conda-forge jupyterOnce Jupyter is installed, you can start a Jupyter Notebook session by running the following command:
jupyter notebook --no-browser --port=8888Jupyter Notebook will start and display a URL in the terminal window, which you will need to copy and paste into a web browser on your local machine.
You will be prompted to enter a token to authenticate. You can find the token in the terminal window, which will look something like this:

Copy the URL, paste it into a web browser on your local machine, and replace localhost
with hoffman2.idre.ucla.edu.
You will be prompted to enter the token. Copy the token from the terminal window and paste it into the appropriate field on the login page.
Once you are authenticated, you will be presented with the Jupyter Notebook interface and can start working on your projects.
It's important to note that you will need to have an active user account on the Hoffman2 Cluster and a working internet connection to use Jupyter Notebook. You may also need to configure your firewall settings to allow Jupyter Notebook to connect to the Hoffman2 Cluster.
If you encounter any issues while connecting, you can refer to the official website link provided for more information and troubleshooting steps, or contact the cluster administrator for support.
Submitting Jobs
Create a job script: Before you can submit a job, you need to create a job script
that contains the commands you want to run on the cluster. The script should also include
instructions for the SLURM scheduler, such as the resources needed for the job (e.g., number of CPU
cores, memory, time limit, etc.) and the output and error files. You can use a text editor like
nano or vi to create the script file, and save it with a .sh
extension.
Here's an example of a job script for a simple bash command that prints "Hello, world!" to a file:
#!/bin/bash
#SBATCH --partition=general
#SBATCH --job-name=hello
#SBATCH --output=hello.out
#SBATCH --error=hello.err
#SBATCH --ntasks=1

echo "Hello, world!" > hello.txt
This script requests to run on the general partition of the cluster, sets the job name to "hello,"
and specifies the output and error files. The script then runs the echo command to
print the message to a file named hello.txt.
Load the required modules: Before you can run the job script, you may need to load
any required software modules using the module load command. You can check the
available modules on the cluster using the module avail command, and load the required
modules by specifying the module name, version, and any dependencies.
For example, if you need to use the Python 3.7 module, you can load it with the following command:
module load python/3.7Submit the job: Once you have created the job script and loaded any required
modules, you can submit the job to the SLURM scheduler using the sbatch command. The
sbatch command takes the name of the job script as an argument, and returns a job ID
number that you can use to monitor the job status.
For example, to submit the "hello" job script, you can use the following command:
sbatch hello.shCheck the job status: You can check the status of your job using the
squeue command, which displays a list of all running and pending jobs on the cluster.
You can use the -u option to filter the list by user, and the -j option to
display the details of a specific job ID.
For example, to check the status of the "hello" job, you can use the following command:
squeue -j JOB_IDRetrieve the output: Once the job has finished, you can retrieve the output files
from the cluster using the File Transfer Protocol (FTP) or the Secure File Transfer Protocol (SFTP).
You can use a client such as FileZilla to transfer files, or use command line tools such as
scp, rsync, and sftp.
For example, to retrieve the output file hello.txt from the cluster to your local
machine, you can use the following command:
scp username@hoffman2.idre.ucla.edu:/path/to/hello.txt /local/destination/pathTransferring and Managing Data
Transferring Data
You can transfer data to and from the Hoffman2 Cluster using the File Transfer Protocol (FTP) or the Secure File Transfer Protocol (SFTP). You can use a client such as FileZilla to transfer files, or use command-line tools such as scp, rsync, and sftp.
Here's how you can transfer files using the scp command:
scp /local/path/to/file username@hoffman2.idre.ucla.edu:/remote/path/to/destinationThis command transfers the file from your local machine to the Hoffman2 Cluster. You can also transfer files from the cluster to your local machine by switching the local and remote paths.
Managing Data
It's essential to keep your data organized and backed up on the Hoffman2 Cluster. The cluster provides different storage options such as home, project, and scratch:
- Home directory: The home directory is a personal directory that is backed up regularly. It has a limited amount of storage, and you should avoid storing large files or data sets in this directory.
- Project directory: The project directory is intended for collaborative research projects and has more storage than the home directory. It is backed up once a day, and the files are accessible to all members of the project.
- Scratch directory: The scratch directory is not backed up and is intended for temporary storage and storing large data sets. You can use this directory to store intermediate results and data files that you no longer need.
You can check your disk usage and quota using the quota command. You can also list the contents of a directory using the ls command, and create new directories using the mkdir command.
For example, to create a new directory called "mydata" in your home directory, you can use the following command:
mkdir ~/mydataYou can also move files and directories using the mv command, copy files and directories using the cp command, and delete files and directories using the rm command.
For example, to move a file called data.txt from your home directory to the project directory, you can use the following command:
mv ~/data.txt /path/to/project/directory/Overall, transferring and managing data on the Hoffman2 Cluster requires using tools like scp, rsync, and sftp to transfer files, and using commands like quota, ls, mkdir, mv, cp, and rm to manage your data files and directories. By following these steps, you can keep your data organized, secure, and accessible, and ensure that your research projects are successful.
Managing the Environment
This section provides guidance on how to manage the software environment on the Hoffman2 Cluster. It explains that the cluster uses the Environment Modules package to manage the software environment and allows users to easily switch between different versions of software packages and libraries. The section provides an example of how to load modules using the module load command and notes that users can use the module list command to see a list of currently loaded modules.
Loading Modules
The cluster uses the Environment Modules package to manage the software environment. The Environment Modules package allows you to easily switch between different versions of software packages and libraries.
Once you are logged in to the Hoffman2 Cluster, you will need to load the modules that you need to access the software and tools on the cluster. You can do this by typing the command module load package_name and replacing package_name with the name of the package you want to load.
For example, to load the GCC compiler, you can use the following command:
module load gccYou can use the module avail command to see a list of available modules on the cluster, and the module list command to see the modules that are currently loaded.
Unloading Modules
You can also unload a module using the module unload package_name command. This command removes the module from your environment.
Managing Your Environment
You can create and manage your own environment on the Hoffman2 Cluster using the module spider command. This command allows you to search for modules, see module dependencies, and view available versions of a module.
For example, to search for a module, you can use the following command:
module spider package_nameTo view the dependencies of a module, you can use the following command:
module spider package_name --depsYou can also use the module save command to create a module file that loads a specific set of modules. This can be useful if you frequently use the same modules for your work.
Changing Default Modules
You can change the default modules that are loaded when you log in to the Hoffman2 Cluster by creating a module file in your home directory. This module file is called ~/.modules, and it specifies the modules that should be loaded when you log in.
For example, to set the default module to load the GCC compiler, you can create a .modules file in your home directory with the following line:
module load gccRemoving Custom Modules
You can remove custom modules that you have created using the module purge command. This command removes all loaded modules from your environment, including custom modules that you have created.
By following these steps, you can set up and manage your environment on the Hoffman2 Cluster, allowing you to easily switch between different software packages and libraries and customize your environment to meet your specific needs.
Monitoring the Cluster Status
This section provides guidance on how to monitor the status of the Hoffman2 Cluster. It explains that users can use the sinfo command to check the status of the cluster, including the number of jobs running, the number of nodes available, and the amount of memory and CPU time used by jobs.
Checking the Status of Nodes
The sinfo command displays a summary of the status of nodes on the cluster. By default, it shows the status of all nodes in the cluster. The output includes the state of each node, such as "idle," "alloc," or "drain," as well as the number of CPUs, memory, and other resources available on each node.
To run the sinfo command, simply type the following command in your terminal:
sinfoViewing Job Information
You can also use the squeue command to view information about jobs that are currently running or pending on the cluster. This command displays information such as the job ID, user, partition, and job status, as well as the resources being used by the job, such as memory and CPU time.
To view information about all jobs on the cluster, you can run the following command:
squeueYou can also use the -u option to view information about your own jobs:
squeue -u usernameMonitoring Resource Usage
The sacct command allows you to monitor resource usage for jobs that have completed. This command displays detailed information about the resources used by each job, including CPU time, memory usage, and I/O operations.
To view resource usage for all completed jobs, you can run the following command:
sacctYou can also use the -u option to view information about your own jobs:
sacct -u usernameViewing System Logs
Finally, you can view system logs to monitor the performance of the cluster and diagnose any issues. The system logs are stored in the /var/log directory on the cluster.
To view the system logs, you can use the tail command. For example, to view the last 100 lines of the messages log, you can run the following command:
tail -n 100 /var/log/messagesBy using these commands, you can monitor the status of the Hoffman2 Cluster and track resource usage to ensure that your jobs are running smoothly and efficiently.
Troubleshooting
This section provides guidance on how to troubleshoot issues on the Hoffman2 Cluster. It explains that users can check the IDRE website for troubleshooting tips and contact the IDRE support team for assistance.
Check the Documentation
The first step to troubleshooting issues on the Hoffman2 Cluster is to consult the official documentation. The documentation includes detailed information about how to use the cluster, including instructions on how to submit jobs, transfer data, and monitor system performance.
Contact the Cluster Support Team
If you are unable to resolve your issue using the documentation, you can contact the Cluster Support Team for assistance. The support team is available to answer questions and provide guidance on how to use the cluster effectively.
You can contact the Cluster Support Team by sending an email to hpc@idre.ucla.edu or by submitting a support request through the IDRE website.
Check System Logs
If you are experiencing issues with a specific job or task, you can check the system logs to diagnose the issue. The system logs are stored in the /var/log directory on the cluster.
You can use the tail command to view the last few lines of a log file. For example, to view the last 100 lines of the messages log, you can run the following command:
tail -n 100 /var/log/messagesCheck Job Status
If you are experiencing issues with a job that you have submitted, you can check the status of the job using the squeue command. This command displays information about jobs that are currently running or pending on the cluster, including the job ID, user, partition, and job status.
If your job is not running, you can try resubmitting it or adjusting the job parameters to use fewer resources.
Check Storage Space
If you are experiencing issues with transferring or managing data on the cluster, you may be running out of storage space. You can check your available storage space using the df command.
For example, to view the available space on your home directory, you can run the following command:
df -h ~Check Network Connection
If you are unable to connect to the cluster, you may be experiencing network connectivity issues. You can check your network connection using the ping command.
For example, to test connectivity to the cluster, you can run the following command:
ping hoffman2.idre.ucla.eduCheck Firewall Settings
If you are unable to connect to the cluster, you may need to adjust your firewall settings to allow access to the cluster. You can check your firewall settings using the iptables command.
For example, to view your current firewall rules, you can run the following command:
iptables -LBy using these troubleshooting steps, you can diagnose and resolve common issues on the Hoffman2 Cluster and ensure that your work proceeds smoothly and efficiently.